Difference between Ionic and CordovaIonic and Apache Cordova are not considered competitors; instead, Ionic is built on top of Cordova. They are two popular technologies widely adopted in the market for mobile app development. The combination of these technologies forms a development platform which is known as hybrid app development. Both frameworks have a large community of passionate developers and are used in large enterprises. In this section, we are going to see how Ionic is different from Apache Cordova. Apache CordovaApache Cordova is an open-source framework, which allows web developers to use HTML, CSS, and JavaScript to create a native application for different mobile platforms. Nitobi created it in 2009. In 2011, Adobe Systems purchased Nitobi and renamed it Phonegap. Apache Cordova allows developers to access the native features of an application, such as camera, video recording, audio feature, location access, etc. With the Cordova, you can integrate a lot of different plugins in your application to fulfill all the requirement that uses the hardware of a device to run the application. Advantages of Cordova The most popular advantages of Apache Cordova are as follows:
Disadvantages of Cordova The disadvantages of Apache Cordova are as follows:
IonicIonic is an open-source UI toolkit for building high-quality Mobile apps, desktop apps, and progressive web apps. It uses web technologies such as HTML, CSS, and JavaScript to create high-quality cross-platform apps. It allows developers to build once and run everywhere. It was created by Max Lynch, Ben Sperry, and Adam Bradley and developed by Drifty Co. in 2013. The first version of the Ionic framework introduced in March 2014. The Ionic framework mainly focuses on front-end user experience or UI interaction, which handles all the look and feel of your app. It is easy to learn and can integrate with other libraries or frameworks such as Angular, React, Cordova, etc. Officially, the Ionic framework has integration with Angular, but it also provides support for Vue.js and React.js. Advantages of Ionic The advantages of the Ionic application are as follows:
Disadvantages of Ionic The disadvantages of Ionic application are as follows:
Ionic vs. CordovaThe major differences between Ionic and Cordova are as follows: 
|

IT4141
วันพุธที่ 25 พฤศจิกายน พ.ศ. 2563
Ionic and Cordova
วันอาทิตย์ที่ 31 มีนาคม พ.ศ. 2562
Scratch Programming
Scratch Programming
https://school.dek-d.com/blog/coding/scratch/scratch-for-kid/
https://school.dek-d.com/blog/coding-game/scratch-ตอนที่-2-มาเขียนโปรแกรมส/
https://school.dek-d.com/blog/coding/scratch/scratch-ตอนที่-3-พาเฮลิคอปเตอร์ท/
https://school.dek-d.com/blog/coding/scratch/scratch-ตอนที่-4-มาสร้างเกมวิ่งแ/
https://school.dek-d.com/blog/coding/scratch/scratch-ep5-เกมเด้งบอล/
https://school.dek-d.com/blog/coding/scratch/scratch-ep5-เกมเด้งบอล2/
https://school.dek-d.com/blog/coding/scratch/scratch-ep-6/
https://school.dek-d.com/blog/coding/scratch/scratch-motion/
https://school.dek-d.com/blog/coding/scratch/scratch-ep-8/
https://school.dek-d.com/blog/no-cate/ลูก-5-ขวบ-จะเรียนเขียนโปร/
เริ่มเรียนเขียนโปรแกรมตั้งแต่ 8 ขวบด้วย SCRATCH
https://school.dek-d.com/blog/coding/scratch/scratchjr-1/
https://www.facebook.com/kidcoding/
วันศุกร์ที่ 29 มีนาคม พ.ศ. 2562
วันพฤหัสบดีที่ 7 มีนาคม พ.ศ. 2562
Ping show date time
ping -t abc.com|cmd /q /v /c "(pause&pause)>nul & for /l %a in () do (set /p "data=" && echo(!date! !time! !data!)&ping -n 2 abc.com>nul"
ping -t fl8|cmd /q /v /c "(pause&pause)>nul & for /l %a in () do (set /p "data=" && echo(!date! !time! !data!)&ping -n 2 fl8>nul"
ping -t fl8|cmd /q /v /c "(pause&pause)>nul & for /l %a in () do (set /p "data=" && echo(!date! !time! !data!)&ping -n 2 fl8>nul"
วันเสาร์ที่ 15 ธันวาคม พ.ศ. 2561
Build React Native on Windows
เช็คการติดตั้ง React Native บน Windows
1.ที่หน้าจอ node.js cmd ใช้คำสั่ง
react-native --version
2.https://facebook.github.io/react-native/docs/getting-started

Create React Native Project
ที่หน้าจอ node.js cmd ใช้คำสั่ง
react-native init TestProject
Build React Native on Windows
1.เปิดไฟล์ project\android\app\build.gradle
แก้ไขจาก
buildTypes {
release {
minifyEnabled enableProguardInReleaseBuilds
proguardFiles getDefaultProguardFile("proguard-android.txt"), "proguard-rules.pro"
}
เป็น
buildTypes {
release {
signingConfig signingConfigs.debug
}
2.ที่หน้าจอ node.js cmd ใช้คำสั่ง cd ไปที่โฟลเดอร์ project\android\
cd android
จากนั้นใช้คำสั่ง
gradlew assembleRelease
3.มันจะ build จนสำเร็จ
BUILD SUCCESSFUL in 13s
ไฟล์ apk จะอยู่ที่
project\android\app\build\outputs\apk\release\
1.ที่หน้าจอ node.js cmd ใช้คำสั่ง
react-native --version
2.https://facebook.github.io/react-native/docs/getting-started

The SDK Manager can also be found within the Android Studio "Preferences" dialog, under Appearance & Behavior → System Settings → Android SDK.
Select the "SDK Platforms" tab from within the SDK Manager, then check the box next to "Show Package Details" in the bottom right corner. Look for and expand the
Android 8.1 (Oreo) entry, then make sure the following items are checked:Android SDK Platform 27Intel x86 Atom_64 System ImageorGoogle APIs Intel x86 Atom System Image
Next, select the "SDK Tools" tab and check the box next to "Show Package Details" here as well. Look for and expand the "Android SDK Build-Tools" entry, then make sure that
27.0.3 is selected.
Finally, click "Apply" to download and install the Android SDK and related build tools
เพิ่ม ANDROID_HOME=โฟลเดอร์ Android SDK
Create React Native Project
ที่หน้าจอ node.js cmd ใช้คำสั่ง
react-native init TestProject
Build React Native on Windows
1.เปิดไฟล์ project\android\app\build.gradle
แก้ไขจาก
buildTypes {
release {
minifyEnabled enableProguardInReleaseBuilds
proguardFiles getDefaultProguardFile("proguard-android.txt"), "proguard-rules.pro"
}
buildTypes {
release {
signingConfig signingConfigs.debug
}
cd android
จากนั้นใช้คำสั่ง
gradlew assembleRelease
3.มันจะ build จนสำเร็จ
BUILD SUCCESSFUL in 13s
ไฟล์ apk จะอยู่ที่
project\android\app\build\outputs\apk\release\
วันจันทร์ที่ 12 พฤศจิกายน พ.ศ. 2561
วิธีการใช้ Google Sheets เป็นระบบเฝ้าระวังเว็บไซต์ (Website Monitoring) จากภายนอกองค์กร
cr.https://sysadmin.psu.ac.th/2014/10/11/googleappsscript-googlesheet-websitemonitoring/
จาก “วิธีการใช้ Google Sheets เป็นฐานข้อมูล” ซึ่งได้กล่าวถึงพื้นฐานการพัฒนา Google Apps Script เพื่อใช้ต่อยอดความสามารถของ Google Sheets สามารถนำมาประยุกต์ใช้เพื่อเฝ้าระวังบริการเว็บไซต์จากภายนอกระบบเครือข่ายขององค์กรได้ (จาก Google Cloud Infrastructure เลยทีเดียว)
ขั้นตอนในการทำ
1.ในโปรเจค ProjectMyDB สร้างไฟล์ monitoring.gs ดังภาพ
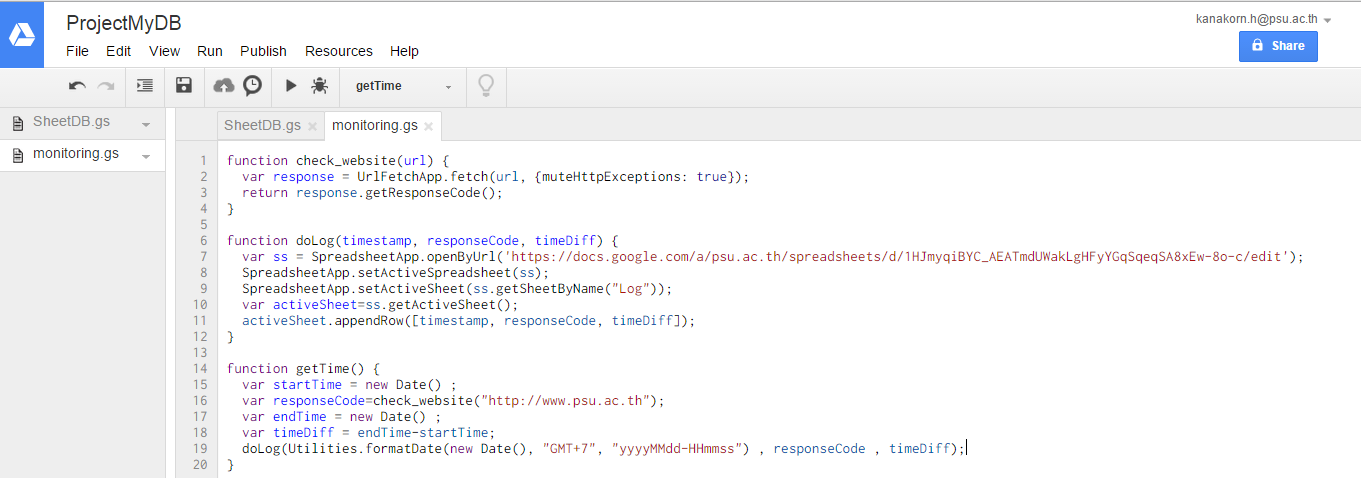
2.ประกอบด้วย 3 ฟังก์ชัน คือ
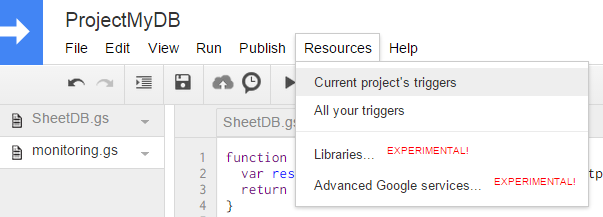
3.สร้าง Trigger ด้วยเมนู Resources > Current project’s triggers


จาก “วิธีการใช้ Google Sheets เป็นฐานข้อมูล” ซึ่งได้กล่าวถึงพื้นฐานการพัฒนา Google Apps Script เพื่อใช้ต่อยอดความสามารถของ Google Sheets สามารถนำมาประยุกต์ใช้เพื่อเฝ้าระวังบริการเว็บไซต์จากภายนอกระบบเครือข่ายขององค์กรได้ (จาก Google Cloud Infrastructure เลยทีเดียว)
ขั้นตอนในการทำ
1.ในโปรเจค ProjectMyDB สร้างไฟล์ monitoring.gs ดังภาพ
2.ประกอบด้วย 3 ฟังก์ชัน คือ
function check_website(url) {
  var response = UrlFetchApp.fetch(url, {muteHttpExceptions: true});
  return response.getResponseCode();
}

function doLog(timestamp, responseCode, timeDiff) {
  var ss = SpreadsheetApp.openByUrl('https://docs.google.com/a/psu.ac.th/spreadsheets/d/1HJmyqiBYC_AEATmdUWakLgHFyYGqSqeqSA8xEw-8o-c/edit');
  SpreadsheetApp.setActiveSpreadsheet(ss);
  SpreadsheetApp.setActiveSheet(ss.getSheetByName("Log"));
  var activeSheet=ss.getActiveSheet();
  activeSheet.appendRow([timestamp, responseCode, timeDiff]);
}

function getTime() {
  var startTime = new Date() ;
  var responseCode=check_website("http://www.psu.ac.th");
  var endTime = new Date() ;
  var timeDiff = endTime-startTime;
  doLog(Utilities.formatDate(new Date(), "GMT+7", "yyyyMMdd-HHmmss") , responseCode , timeDiff);
}
- check_website ใช้ UrlFetchApp เพื่อ url ของเว็บไซต์ แล้วรีเทิร์นผล Response Code ของ HTTP Protocol กลับไป
- doLog ใช้สำหรับเพิ่มค่า timestamp, responseCode และ timeDiff (เวลาในการตอบสนอง) ลงใน Sheet “Log” ใน Google Sheets ที่กำหนดไว้
- getTime ใช้คำนวนเวลาตั้งแต่เริ่มต้น แล้วเรียกใช้ฟังก์ชั่น check_website และ จับเวลาที่สิ้นสุด จากนั้นคำนวนเป็นเวลาในการตอบสนอง (timeDiff) แล้ว เรียกฟังก์ขัน doLog เพื่อเขียนข้อมูลต่อไป
3.สร้าง Trigger ด้วยเมนู Resources > Current project’s triggers
4.เลือกฟังก์ชัน getTime กำหนดเป็น Time-driven ทำงานในหน่วยนาที (Minute timmer) และ ทำงานทุกๆ 5 นาที แล้วกดปุ่ม Save
5.ผลการทำงาน และการสร้าง Chart ประกอบ ทำให้สามารถเห็นแนวโน้มได้
จากตัวอย่างข้างต้น ทำให้เห็นว่า การใช้ Google Apps Script ร่วมกับ Google Sheet สามารถสร้างระบบเฝ้าระวังเว็บไซต์จากภายนอกองค์กรได้อย่างง่ายๆ และไม่มีค่าใช้จ่าย ทำให้เห็นภาพการใช้งานจากภายนอกได้เป็นอย่างดี
วันพฤหัสบดีที่ 18 ตุลาคม พ.ศ. 2561
แนวทางการใช้งาน LINE Login ในการล็อกอินผ่านเว็บไซต์หรือสมัครใช้บริการ
แนวทางการใช้งาน LINE Login ในการล็อกอินผ่านเว็บไซต์หรือสมัครใช้บริการ
cr.aekawit
Coding ภาษา PHP
Cr.
http://www.ninenik.com/content.php?arti_id=831
ทดลองทำ Line_Login
http://linelogin.epizy.com/index.php
LineLoginLib.php <---ไม่ต้องแก้ครับ
Login_uselib.php,Login_uselib_callbak.php <-- แก้ตรง
Channel id,Channel secret,callback url
https://drive.google.com/folderview?id=1NuL4RiEOjD6u2gTPL0erqunqhe2hpYhj
สมัครสมาชิก:
บทความ (Atom)