
IT4141
วันพุธที่ 11 กันยายน พ.ศ. 2567
วันพฤหัสบดีที่ 8 สิงหาคม พ.ศ. 2567
วิธีการ Deploy VMware vCenter Server บน ESXi Host
cr.https://www.ablenet.co.th/2023/05/02/deploy-vmware-vcenter-server-on-esxi-host/
บทความนี้ จะมาอธิบายวิธีการลง VMware vCenter Server แต่ก่อนจะไปถึงวิธีการลง เรามาทำความรู้จัก VMware vCenter Server แบบคร่าวๆกันก่อนดีกว่า
VMware vCenter Server คืออะไร?

- VMware vCenter Server คือ product ของ VMware ซึ่งมีหน้าที่ในการจัดการกับ product อื่นๆของ VMware เช่น VMware ESXi, vSphere Storage, VM ทั่วๆไป หรือแม้แต่จัดการกับ vCenter อื่นๆก็สามารถทำได้ โดยคุณสมบัติหลักของ vCenter Server มีดังนี้
- vSphere vSphere High Availability (HA)
- vSphere Distributed Resource Scheduler (DRS)
- vSphere Storage DRS (SDRS)
- vSphere vMotion (Host and Storage)
- vSphere Fault Tolerance (FT)
วิธีการลง VMware vCenter Server
Step 1: เตรียม ESXi Server สำหรับการลง vCenter ให้พร้อม
Step 2: Mount File vCenter ซึ่งสามารถดาวน์โหลดได้จาก ที่นี่
Step 3: เข้าไปที่ Path ดังรูป แล้วดับเบิ้ลคลิกไฟล์ installer.exe

Step 4: จะปรากฎเมนูดังรูป กด Install

Step 5: การ Install แบ่งเป็น 2 Stage ดังนี้
- Stage 1: เป็นการ Deploy new appliance
- Stage 2: เป็นการ Setup appliance ที่ Deploy เสร็จแล้ว
จากนั้นกด Next เพื่อเข้าสู่ Stage ที่ 1

Step 6: เลือก Type การ Deploy (แนะนำเป็นแบบ Embedded)

Step 7: กรอกข้อมูล ESXi Server ที่ใช้สำหรับลง vCenter

Step 8: กรอกชื่อ และ Root password ของ VM

Step 9: เลือก Deployment size โดยให้ดูจาก จำนวน Hosts และ VMs ที่ต้องการให้ vCenter บริหารจัดการ จากนั้นค่อยจัดหาทรัพยากรที่เหมาะสม ตัวอย่างเช่น
- ในระบบต้องการบริหารจัดการ 50 Hosts และ 400 VMs ให้เลือก Deployment size เป็น “small” และจัดหา Server สำหรับ vCenter ที่รองรับการ Deploy แบบ small เป็นต้น

Step 10: เลือก Datastore

Step 11: ตั้งค่า Network ที่ใช้

Step 12: Deploy vCenter (ใช้เวลาประมาณ 1 – 2 ชม. ขึ้นอยู่กับ Hardware ของ Server นั้น ๆ)

Step 13: เมื่อ Deploy เสร็จ ให้กด Continue

Step 14: จากนั้นจะเข้าสู่ Stage 2 ให้คลิก Next

Step 15: เลือก Sync เวลาของ vCenter (สามารถเลือก Sync เวลากับ ESXi หรือ NTP Server ได้)

Step 16: กรอกข้อมูล Domain และ Password สำหรับการ Login เข้า vCenter

Step 17: ตรวจสอบความถูกต้องของข้อมูล แล้วคลิก Finish (แนะนำให้ Capture ข้อมูลส่วนนี้ไว้)

Step 18: สิ้นสุดการ Setup สามารถกด Appliance Get Start Page เพื่อ Login เข้า vCenter Server หรือกด Close เพื่อปิดหน้าต่างนี้ได้

Step 19: จะปรากฎหน้าต่างของ VMware ให้คลิก Launch Vsphere Client (HTML5)

Step 20: จะประกฎหน้าต่าง Vsphere Client ให้ใส่รหัส administrator@domain.local (สามารถกลับไปดูได้ใน Step )

Step 21: จะปรากฎหน้าต่าง vCenter Server พร้อมใช้งาน

วันอังคารที่ 30 กรกฎาคม พ.ศ. 2567
Local Storage หรือ Cookie สำหรับ Session Token เช่น JWT
"Local Storage หรือ Cookie สำหรับ Session Token เช่น JWT"
ทีนี้เรามาดูกันต่อ ว่าเราควรเก็บไว้ที่ไหนดี
(ส่วนใหญ่เน้นไปที่การโจมตีแบบ XSS การโจมตีแบบอื่นลองดู Ref เพิ่มเติมได้)
.
มีการถกเถียงกันอย่างกว้างขวางว่า ควรเก็บ Token ใน Local Storage หรือ Cookie แบบ HttpOnly ดี แต่จากศึกษาพบว่าการเลือกเก็บ Token ในแต่ละแบบมีข้อดีและข้อเสียของมันอยู่ และไม่ได้แปลว่าการเก็บใน Local Storage จะแย่เสมอไป (Ref #1)
.
.
เราต้องเก็บข้อมูลบางอย่างเพื่อให้ User ไม่ต้องกรอกข้อมูล Username/Password ตลอดเวลาทุกครั้งที่มี Request ไปหา Server, และถ้าคุณมี Token คุณก็สามารถเข้าถึงข้อมูลได้ เปรียบเหมือนเราถือเช็คเงินสดที่ออกโดยธนาคาร ใครก็ตามที่มีเช็คก็สามารถเบิกเงินได้ ธนาคารไม่ต้องคอยมาตรวจสอบว่าคุณคือเจ้าของเช็คเงินสดอีกมั้ย (แต่ในบริบทของ Token จะแตกต่างกันไปบ้าง) (Ref #1 จากคุณ Pedro M. M.)
.
.
- สามารถเข้าถึงได้จาก JavaScript, Local Storage สามารถเข้าถึงได้ผ่าน JavaScript โดยตรงเลย
- ความง่ายในการใช้งาน: Local Storage สามารถเข้าถึงได้ง่ายผ่าน JavaScript ทำให้การจัดการกับ Token ในฝั่ง Client เป็นไปอย่างสะดวกและรวดเร็ว
- ความยืดหยุ่น: ในกรณีของ Single Page Applications (SPAs) Local Storage มอบความยืดหยุ่นในการจัดการกับ Session Token และช่วยให้ประสบการณ์การใช้งานเป็นไปอย่างราบรื่น
.
.
- ป้องกันการเข้าถึงจาก JavaScript: HttpOnly Cookies ไม่สามารถเข้าถึงได้จาก JavaScript แต่ทุกครั้งที่มีการส่ง Request ไป Server เจ้าตัวของ Cookies นั้นก็จะถูกแนบไปด้วยทุกครั้ง ดังนั้น Hacker ที่มีประสบการณ์และมีเวลามากพอ จะสามารถข้าม HttpOnly ไปได้ โดยเทคนิคอื่นๆ (Ref 1: พี่คริสอธิบาย, Ref 3: "Why HttpOnly Won't Protect You" โดย PDP, Ref 4: Securing cookies with httponly and secure flags)
- การใช้งานกับ Server-Side Rendering (SSR): การเก็บ Token ใน HttpOnly Cookies ทำให้สามารถเข้าถึง Token ได้ในฝั่ง Server ซึ่งมีประโยชน์ในการทำ SSR
.
.
- หาก Token อยู่ใน LocalStorage ผู้โจมตีสามารถขโมยToken เพื่อใช้งานในภายหลังได้ และถ้าเป็น Cookie ผู้โจมตีต้องยิง Request บน Browser ของเหยื่อ ซึ่งอาจจะทำได้ลำบากกว่า
.
.
การโจมตีแบบ XSS (Ref 2) เป็นการโจมตีทางเว็บที่แฮกเกอร์แทรกโค้ดที่เป็นอันตรายลงในหน้าเว็บหรือแอปพลิเคชันเว็บ ซึ่งจะทำงานเมื่อผู้ใช้เปิดหน้าเว็บหรือแอปพลิเคชันนั้นๆ โค้ดที่เป็นอันตรายมักจะเป็นสคริปต์ JavaScript ที่สามารถขโมยข้อมูลสำคัญจากผู้ใช้หรือทำให้เกิดพฤติกรรมที่ไม่พึงประสงค์ได้
.
เช่น การโจมตีแบบ Stored XSS (Persistent XSS)
ผู้โจมตีแทรกโค้ดที่เป็นอันตรายลงในเว็บไซต์ เช่น ในฟอร์มการกรอกข้อมูลหรือในช่องแสดงความคิดเห็น
เมื่อผู้ใช้คนอื่นเข้าชมหน้าเว็บที่มีข้อมูลที่ถูกแทรก โค้ดที่เป็นอันตรายจะถูกเรียกใช้งาน โค้ดที่เป็นอันตรายนี้สามารถเข้าถึง localStorage และขโมยข้อมูลที่เก็บไว้ได้
.
.
- การตรวจสอบและทำความสะอาดข้อมูล: ตรวจสอบและทำความสะอาดข้อมูลที่ได้รับจากผู้ใช้ก่อนที่จะนำไปแสดงผล
- การใช้ Content Security Policy (CSP): กำหนดนโยบายความปลอดภัยในการโหลดสคริปต์และเนื้อหาอื่นๆ บนหน้าเว็บ
- การเข้ารหัสข้อมูลที่ส่งไปยังเซิร์ฟเวอร์: ใช้การเข้ารหัสข้อมูลในฟอร์มและการร้องขอ HTTP เพื่อป้องกันการแทรกสคริปต์ที่เป็นอันตราย
- การหลีกเลี่ยงการแสดงผลข้อมูลที่ไม่ได้รับการตรวจสอบ: หลีกเลี่ยงการแสดงผลข้อมูลจากผู้ใช้โดยตรงโดยไม่ผ่านการตรวจสอบและทำความสะอาด
.
.
.
- ทั้ง Local Storage และ HttpOnly Cookies มีความเสี่ยงในกรณีที่เกิดการโจมตีแบบ XSS หากผู้โจมตีสามารถ inject script ลงในเว็บไซต์ได้ เขาก็สามารถทำการโจมตีและเรียกใช้ API ในนามของผู้ใช้ได้เหมือนกัน ไม่ว่าจะเก็บ Token ไว้ที่ไหน
- ออกแบบ Access Token ให้มีอายุสั้น เพื่อลดผลกระทบหาก Token ถูกขโมย ใช้คู่กับ Refresh Token
- การป้องกัน XSS จึงเป็นสิ่งสำคัญที่สุด ไม่ว่าจะเลือกใช้วิธีการเก็บ Token แบบใด การทำความสะอาดข้อมูล (Data Sanitization) อย่าให้ script ใดๆ เข้าไปในระบบ และแสดงผลออกมาทำงานได้ และการตรวจสอบ Input อย่างเข้มงวดสามารถลดความเสี่ยงจากการโจมตีได้
.
.
การเก็บ Session Token ใน Local Storage ไม่ได้แย่เสมอไป ขึ้นอยู่กับการออกแบบระบบและการป้องกันความปลอดภัยที่มีอยู่ การใช้ HttpOnly Cookies อาจเพิ่มความยากลำบากในการโจมตีจาก XSS แต่ไม่ใช่วิธีการที่ปลอดภัยอย่างสมบูรณ์
.
การออกแบบระบบให้ปลอดภัยนั้นไม่สามารถพึ่งพาวิธีการเก็บ Token เพียงอย่างเดียวได้ ต้องพิจารณาปัจจัยหลายอย่างรวมถึงการป้องกัน XSS การใช้ Secure Cookies และการใช้ Token ที่มีอายุการใช้งานสั้น การออกแบบระบบความปลอดภัยต้องคำนึงถึงทุกจุดที่อาจเป็นช่องโหว่ เพื่อให้แน่ใจว่าระบบมีความปลอดภัยที่สุดเท่าที่จะเป็นไปได้
.
ในท้ายที่สุด การป้องกัน XSS และการรักษาความปลอดภัยในทุกๆ ด้านของระบบเป็นสิ่งที่สำคัญที่สุดในการปกป้องข้อมูลของผู้ใช้
.
ผมเตรียมเอกสารไว้อ่านเพิ่มเติมสำหรับคนที่อยากเข้าใจริงๆ และช่วยประกอบการตัดสินใจ (อยู่ใน Comment)
- Ref 1: การพูดคุยถกเถียงใน Community
- Ref 2: การโจมตีแบบ Cross Site Scripting (XSS)
- Ref 3: การใช้ HttpOnly Cookie ใน Session Token (JWT)
- Ref 4: พฤติกรรมของ HttpOnly Cookie ช่วยป้องกันอะไร
- Ref 5: ความปลอดภัยใน Cookie ทำงานอย่างไร
- Ref 6: ความปลอดภัยใน Local Storage
- Ref 7: ตัวอย่างการทำ SPA ให้ปลอดภัย
- Ref 8: เทคนิคการโจมตีแบบอื่นๆ
.
ก่อนจะจากกัน ในการออกแบบ Security ที่ดีเราควรเข้าใจถึงสิ่งที่เราต้องการทำ
รวมถึงความเสี่ยงที่เรารับได้แค่ไหน และอย่าลืมว่ายิ่งสะดวกสบาย ความปลอดภัยอาจจะลดลงได้
.
เพื่อให้มันเกิดประโยชน์ต่อเพื่อนๆ
ถ้ารู้สึกว่าตรงไหนไม่ถูกต้อง หรืออยากเสริมตรงไหน สามารถคอมเม้นต์ได้่เลยนะ
อย่างบอกไปโพสที่แล้ว สิ่งที่ผมพอทำได้คือเป็นจุดเริ่มการพูดคุย
อยากสร้าง Communtiy แบบนี้ครับ 
วันจันทร์ที่ 10 มิถุนายน พ.ศ. 2567
4141training

IT4141

PORTFOLIO
Presented by:
SUPATTRA BOONTUA
IT4141

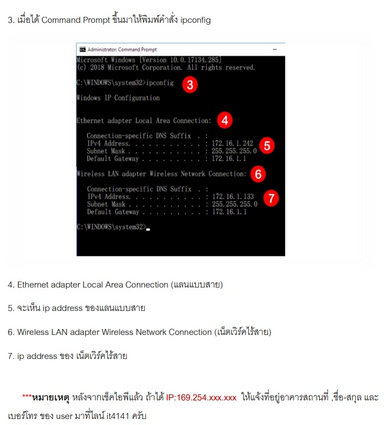
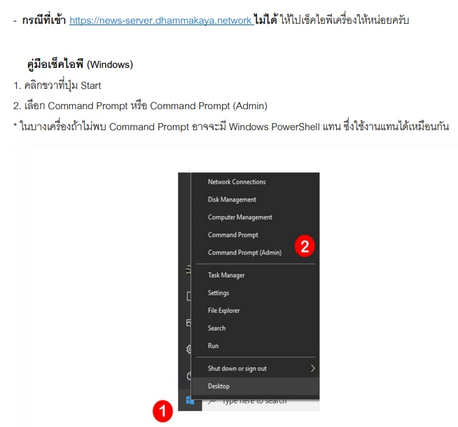
USERหน้าแดง คืออะไร
Userหน้าแดง คือ Userสำหรับสมาชิกภายในองค์กรของวัดพระธรรมกายทั้งพระ อุบาสก อุบาสิกา เจ้าหน้าที่และอาสาสมัครเพื่อให้เข้าใช้อินเตอร์เน็ตภายในองค์กร และเพื่อป้องกันบุคคลภายนอกเข้าถึงข้อมูล
ผ่านเครือข่ายอินเตอร์เน็ต เพื่อควาปลอดภัยขององค์กร
USER องค์กร (USERหน้าแดง)

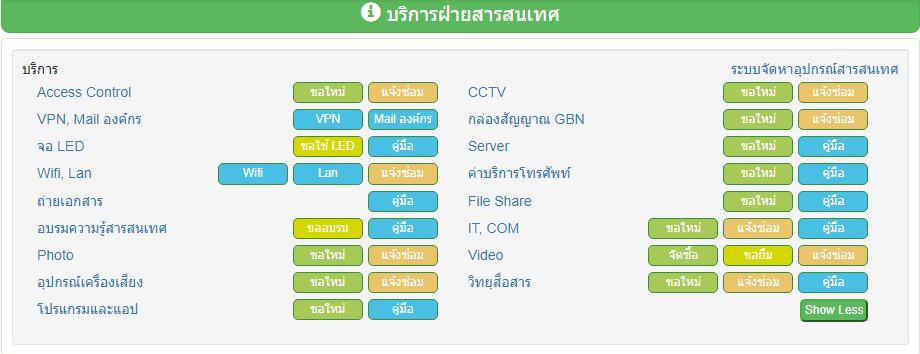


ขอ ACCOUNT ใหม่


ต่ออายุ
ACCOUNT
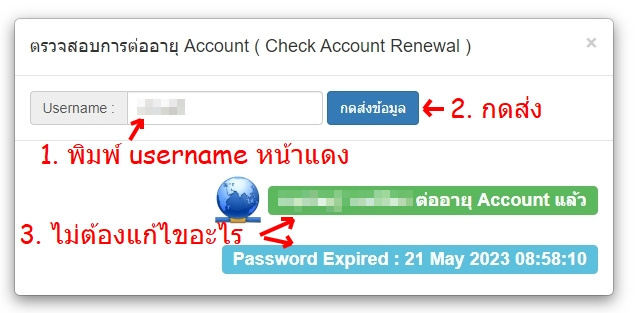
เช็คสถานะ
ACCOUNT
เช็คสถานะ Account หน้าแดง / รหัสผ่าน ด้วยตนเอง ที่

ภาพขั้นตอนการเช็ค

RESET รหัสผ่าน
ปัญหา: จำรหัสผ่านไม่ได้ หรือรหัสผ่านหมดอายุ
1. เข้าไปรีเซ็ตรหัสผ่านได้ที่ลิ้งค์นี้
https://fdnet.dhammakaya.network/new_domain/
(หากไม่เจออีเมล์ที่ระบบส่งไปให้ กรุณาเช็คที่โฟลเดอร์อีเมล์ขยะ หรือ spam mail)
2. ลิ้งค์ภาพตัวอย่างขั้นตอน
เช็ค ACCOUNT ตรวจโค้วต้า

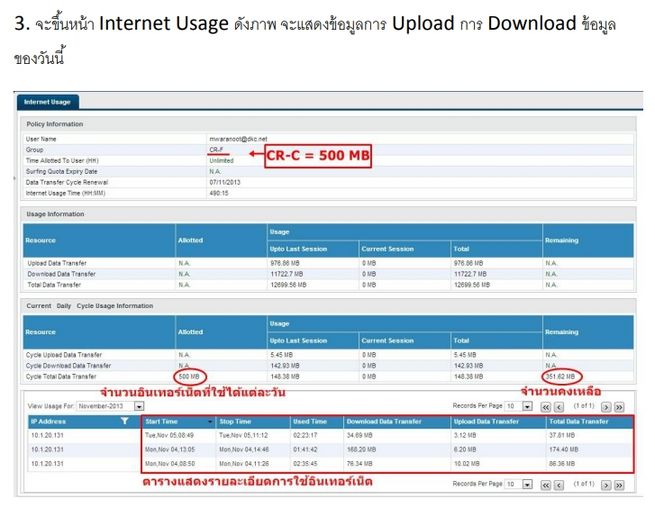
ภาพขั้นตอนการเช็ค
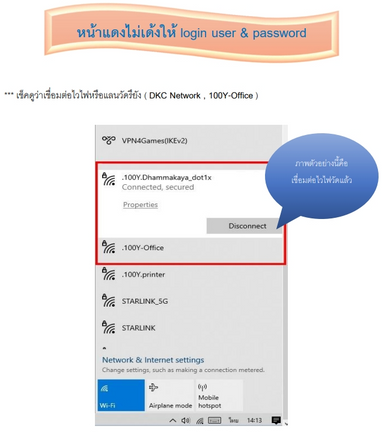
หน้าแดงไม่ขึ้น

รู้จัก SERVER ต่างๆ
1) news-server
2) ss100
3) pr-center
4) newpr
5) photoservice ( ต้อง Join Domain ก่อน )
WIFI ในองค์กร
วิธีการใช้ WIFI
1) 100Y-Office
2) 100Y.Dhammakaya_dot1x
3) DKC Network
4) 100Yprinter
WIFI ในองค์กร
wifi ในองค์แบ่งตามพื้นที่ อาคาร100 ปี
- 100y-dhammakaya-dot1x
- 100y-office
- 100y-printer (ใช้แชร์ปริ้นเตอร์ )
wifi ในองค์แบ่งตามพื้นที่ 2000 ไร่
- สำนักงานใหญ่ : DKC-network (HQ)
- บุญรักษา : Boonraksa
- สภาฯ : DKC Network (Spha)
- วิหารคด : DKC Network (VHK)
- ปราบมาร : Prabman-Zoom-24HR
- อุบาสิกา : DKC-network
- 58 ไร่ : DKC-network


CONTACT US
02-831-1441, 082-782-7733, 082-782-7744
noc@dhammakaya.center
https://fdnet.dhammakaya.network
กองบริการสารสนเทศ อาคาร 100 ปีฯ ตึก 0 ชั้น 11 วัดพระธรรมกาย
IT4141
THANK
YOU
noc@dhammakaya.center
สมัครสมาชิก:
ความคิดเห็น (Atom)