วันศุกร์ที่ 17 มิถุนายน พ.ศ. 2565

Update Dell iDRAC Firmware via Web GUI

 Get the firmware Image

As you can see, this is a windows executable file (can run from windows OS if your server is already loaded with Windows). But, in our case there will be any OS installed and we might no have Windows installed. In that case, we can extract the firmware file from the same .exe file; just extract the .exe file (eg: iDRAC-with-Lifecycle-Controller_Firmware_74GHJ_WN64_2.52.52.52_A00.exe) and find the firmimg.d7 file inside payload folder.

Also read How to Boot from image using vFlash in Dell PowerEdge Servers

Upload the image and Update Firmware

Goto iDRAC settings –> Update and Rollback –> Firmware Update

Browse for the exatracted firmimg.d7 and click upload. Once Uploaded, if the image is valid updater will show you the image name, available version, current version etc. If all okay, select the image (checkbox) and click install.

Installation will take few minutes to complete and iDRAC will reboot. Wait for iDRAC back online and verify the firmware version and verify “Virtual Console” access.

cr . https://www.techbeatly.com/update-dell-idrac-firmware-via-web-gui/

วันอาทิตย์ที่ 15 พฤษภาคม พ.ศ. 2565

วิธีดู JUNK EMAIL / SPam

 
          Picture
สำหรับผู้ใช้ Outlook

            ในกรณีที่คุณใช้อีเมลของทาง Microsoft เช่น @hotmail.com, @live.com, @msn.com หรือ @outlook.com ให้ทำตามขั้นตอนดังนี้
​
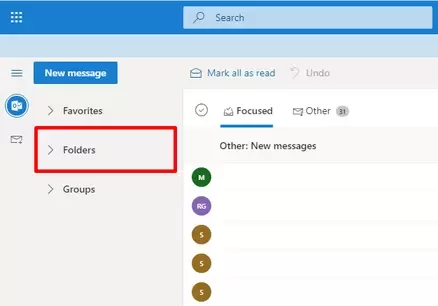
            ​1. เข้าสู่ระบบอีเมลของคุณด้วย Outlook ในเว็บเบราเซอร์ แล้วคลิกไปที่ Folder ตรงเมนูด้านซ้าย
วิธีตั้งค่ารับอีเมลจาก HS Brands ทาง Outlook 01
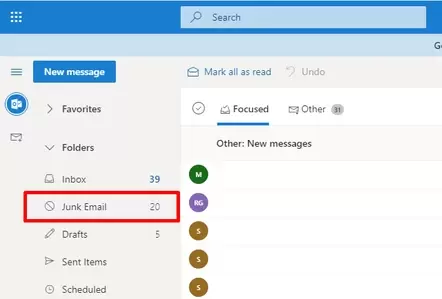
            ​​2. จะเห็นว่ามีโฟลเดอร์อีเมลย่อยปรากฏขึ้นมา ให้คลิกไปที่ Junk Email
วิธีตั้งค่ารับอีเมลจาก HS Brands ทาง Outlook 02
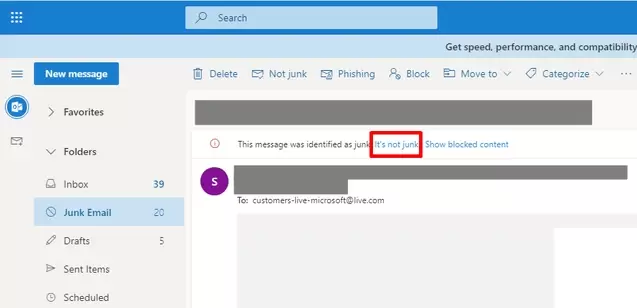
            ​3. ค้นหาแล้วคลิกเปิดอีเมลของเราที่อยู่ใน Junk Email จากนั้นให้ดูที่บริเวณด้านบน ให้คลิกที่ “It's not junk”
วิธีตั้งค่ารับอีเมลจาก HS Brands ทาง Outlook 03
            ​​4. จากนั้นอีเมลจะกลับเข้าไปยัง Inbox ของคุณทันที
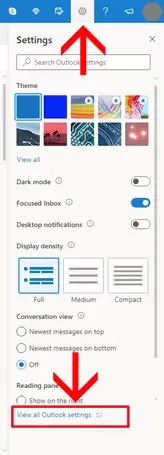
            ​​5. ให้คลิกที่รูปฟันเฟืองมุมบนขวา จากนั้นดูที่มุมล่างขวาสุดแล้วคลิกที่ “View all Outlook settings”
วิธีตั้งค่ารับอีเมลจาก HS Brands ทาง Outlook 04
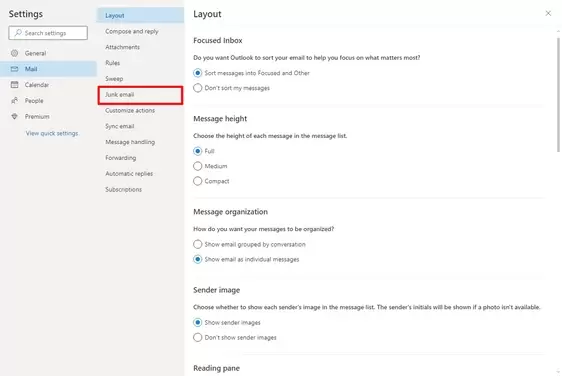
            ​​​6. จะปรากฏหน้าต่างดังภาพ ให้คลิกที่ Junk email
วิธีตั้งค่ารับอีเมลจาก HS Brands ทาง Outlook 05
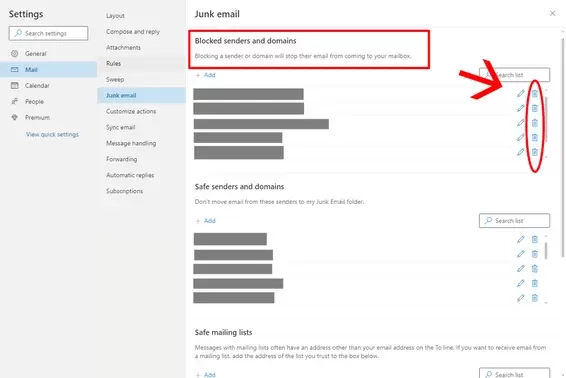
            ​​​7. ให้ดูรายชื่ออีเมลตรง Blocked senders and domains ว่ามีอีเมลของเราอยู่ในนี้ไหม ถ้ามี ให้คลิกที่รูปถังขยะด้านขวาของอีเมลเรา ถ้าไม่มี ให้ไปที่ขั้นตอนต่อไป
วิธีตั้งค่ารับอีเมลจาก HS Brands ทาง Outlook 06
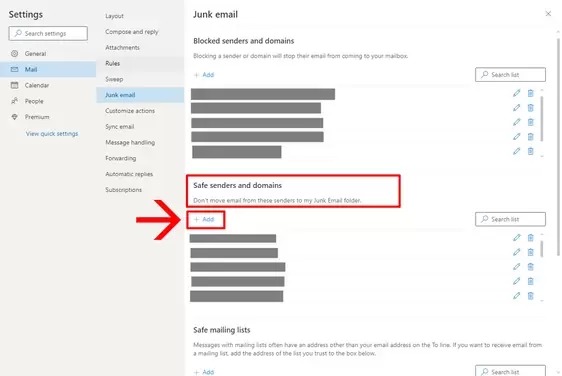
            ​​8​. ดูที่ Safe senders and domains แล้วคลิก + Add
วิธีตั้งค่ารับอีเมลจาก HS Brands ทาง Outlook 07
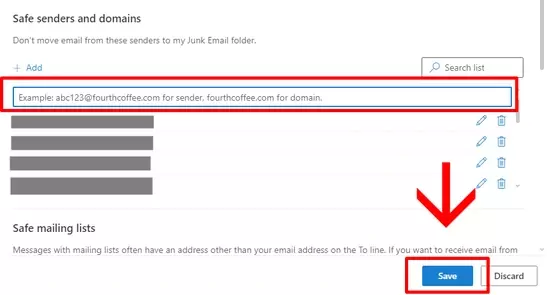
            ​​​9. ให้กรอกอีเมลของเราลงในช่องว่างที่ปรากฏขึ้น แล้วกด Enter จากนั้นกดปุ่ม Save ที่มุมล่างขวามือ
วิธีตั้งค่ารับอีเมลจาก HS Brands ทาง Outlook 08
            ​​​เมื่อตั้งค่าตามขั้นตอนทั้งหมดเสร็จแล้ว อีเมลที่เราส่งให้ต่อจากนี้จะเข้าไปยัง Inbox ของคุณโดยตรง

Picture
สำหรับผู้ใช้ Gmail

            ​​​ในกรณีที่คุณใช้อีเมลของทาง Google คือ @gmail.com ให้คุณทำตามขั้นตอนดังนี้
​
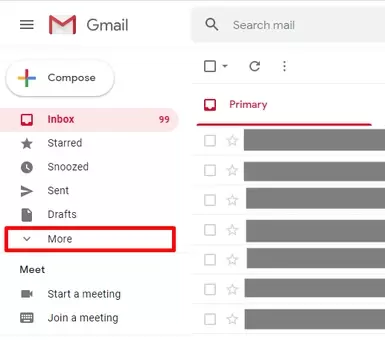
            ​​​​1. เข้าสู่ระบบ Gmail ของคุณ คลิกไปที่ More เพื่อเปิดหน้าโฟลเดอร์ที่ถูกซ่อนไว้
วิธีตั้งค่ารับอีเมลจาก HS Brands ทาง Gmail 01
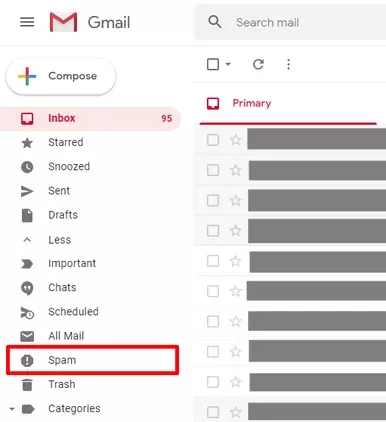
            ​​​​​2. คลิกที่ Spam
วิธีตั้งค่ารับอีเมลจาก HS Brands ทาง Gmail 02
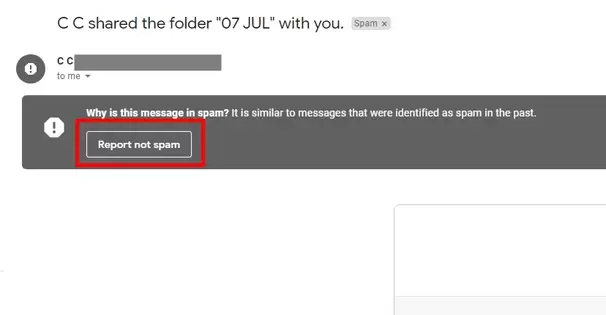
            ​​​​​3. ค้นหาแล้วคลิกเปิดอีเมลของเราที่อยู่ใน Spam จากนั้นให้ดูที่บริเวณด้านบน ให้คลิกที่ “Report not spam”
วิธีตั้งค่ารับอีเมลจาก HS Brands ทาง Gmail 03
            ​​​​4. จากนั้นอีเมลจะกลับเข้าไปยัง Inbox ของคุณทันที
            ​​​5. เปิดอีเมลที่เราตั้งให้ไม่เป็น Spam ในขั้นตอนที่แล้วอีกครั้ง
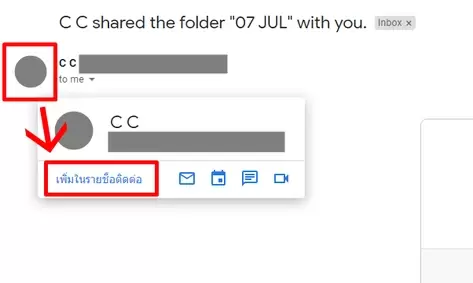
            ​​​​6. คลิกที่รูปภาพหรือชื่อของผู้ส่งอีเมล จะมีหน้าต่างใหม่ขึ้นมา ให้กด “เพิ่มในรายชื่อติดต่อ”
วิธีตั้งค่ารับอีเมลจาก HS Brands ทาง Gmail 04
            ​​​​​เมื่อตั้งค่าตามขั้นตอนทั้งหมดเสร็จแล้ว อีเมลที่เราส่งให้ต่อจากนี้จะเข้าไปยัง Inbox ของคุณโดยตรง

วันพุธที่ 25 พฤศจิกายน พ.ศ. 2563

Ionic and Cordova

Difference between Ionic and Cordova

Ionic and Apache Cordova are not considered competitors; instead, Ionic is built on top of Cordova. They are two popular technologies widely adopted in the market for mobile app development. The combination of these technologies forms a development platform which is known as hybrid app development. Both frameworks have a large community of passionate developers and are used in large enterprises. In this section, we are going to see how Ionic is different from Apache Cordova.

Apache Cordova

Apache Cordova is an open-source framework, which allows web developers to use HTML, CSS, and JavaScript to create a native application for different mobile platforms. Nitobi created it in 2009. In 2011, Adobe Systems purchased Nitobi and renamed it Phonegap.

Apache Cordova allows developers to access the native features of an application, such as camera, video recording, audio feature, location access, etc. With the Cordova, you can integrate a lot of different plugins in your application to fulfill all the requirement that uses the hardware of a device to run the application.

Advantages of Cordova

The most popular advantages of Apache Cordova are as follows:

  • It is a free and open-source technology.
  • It is easy to learn.
  • It is used for developing a cross-platform application.
  • It works on JavaScript.
  • It is used to make app development very quickly and effectively.
  • It has a lot of plugins, which you can integrate into your application to fulfill all the requirements to run the application.
  • It has good community support, which helps you to get rid of all the issues you are getting.

Disadvantages of Cordova

The disadvantages of Apache Cordova are as follows:

  • Its code is running in a web view, which makes its performance slow.
  • It has web-based UI running in a web view, due to which it does not provide a good look and feel to the app.
  • It is not the right technology to develop game application because it requires some higher-end plugins which are currently not available.

Ionic

Ionic is an open-source UI toolkit for building high-quality Mobile apps, desktop apps, and progressive web apps. It uses web technologies such as HTML, CSS, and JavaScript to create high-quality cross-platform apps. It allows developers to build once and run everywhere. It was created by Max Lynch, Ben Sperry, and Adam Bradley and developed by Drifty Co. in 2013. The first version of the Ionic framework introduced in March 2014.

The Ionic framework mainly focuses on front-end user experience or UI interaction, which handles all the look and feel of your app. It is easy to learn and can integrate with other libraries or frameworks such as Angular, React, Cordova, etc. Officially, the Ionic framework has integration with Angular, but it also provides support for Vue.js and React.js.

Advantages of Ionic

The advantages of the Ionic application are as follows:

  • If the developer has a basic knowledge of CSS, HTML, or JavaScript frameworks, then learning and developing apps using the Ionic framework is very easy.
  • Ionic provides simple, easy, and well-structured documentation. The official documentation covered most of the things required for the developers.
  • The ionic application can deploy on multiple platforms such as iOS, Android, Desktop, and the web, all with one codebase. The ionic apps can write once and runs everywhere.
  • The user interface of Ionic, such as themes and components are highly customizable. The ionic platform allows its components to adapt to the platform on which the application is running.

Disadvantages of Ionic

The disadvantages of Ionic application are as follows:

  • The performance of the Ionic app is not as good as compared to native mobile applications. However, the performance gap is not noticeable for most of the average users.
  • The app developed with the Ionic framework may not provide as much security as a native application. For example, if you are developing a financial app, e.g., the app for a bank, the Ionic framework is not recommended.
  • You cannot access any device-specific feature in Ionic without using Apache Cordova. Apache Cordova allows you to integrate the plugins which can add the functionality to access those features. However, there are many plugins available to cover most of the native functionalities.
  • Ionic technology is still in development. It regularly keeps changing its support and standard, and its libraries can be completely rewritten at any time.

Ionic vs. Cordova

The major differences between Ionic and Cordova are as follows:
Ionic vs Cordova
  • Ionic provides frameworks to use in the application. Whereas Cordova provides plugins to run the application similar to the native app.
  • Ionic provides many different functions, which need to be integrated with the application, whereas Cordova provides the hardware access of a device to the application.
  • The Cordova plugin allows you to make your own plugin, whereas Ionic does not provide you to make your own plugin.
  • The developers choose Cordova because of its plugins, excellent community support, and the ability to use JavaScript for mobile development. In contrast, developers choose Ionic for its rapid prototyping, great designs, and hybrid mobile style.
  • The companies use Cordova are BetRocket, HandHeld Hospitality, Die Coder GmbH, and Dial Once. Whereas the companies use Ionic are Edify, MAK IT, eTobb, and Dispatch.
  • The tools integrated with Cordova are Sentry, Wikitude, GameAnalytics, LokiJS, WebStorm, etc. Whereas tools integrate with Ionic are Atatus, Readymag, Backand, JScrambler, etc.


วันพฤหัสบดีที่ 7 มีนาคม พ.ศ. 2562

Ping show date time

ping -t abc.com|cmd /q /v /c "(pause&pause)>nul & for /l %a in () do (set /p "data=" && echo(!date! !time! !data!)&ping -n 2 abc.com>nul"

ping -t fl8|cmd /q /v /c "(pause&pause)>nul & for /l %a in () do (set /p "data=" && echo(!date! !time! !data!)&ping -n 2 fl8>nul"

วันเสาร์ที่ 15 ธันวาคม พ.ศ. 2561

Build React Native on Windows

เช็คการติดตั้ง React Native บน Windows
1.ที่หน้าจอ node.js cmd ใช้คำสั่ง
react-native --version

2.https://facebook.github.io/react-native/docs/getting-started
 

The SDK Manager can also be found within the Android Studio "Preferences" dialog, under Appearance & Behavior → System Settings → Android SDK.
Select the "SDK Platforms" tab from within the SDK Manager, then check the box next to "Show Package Details" in the bottom right corner. Look for and expand the Android 8.1 (Oreo) entry, then make sure the following items are checked:
  • Android SDK Platform 27
  • Intel x86 Atom_64 System Image or Google APIs Intel x86 Atom System Image
Next, select the "SDK Tools" tab and check the box next to "Show Package Details" here as well. Look for and expand the "Android SDK Build-Tools" entry, then make sure that 27.0.3 is selected.
Finally, click "Apply" to download and install the Android SDK and related build tools
   เพิ่ม ANDROID_HOME=โฟลเดอร์ Android SDK

Create React Native Project
ที่หน้าจอ node.js cmd ใช้คำสั่ง
react-native init TestProject

Build React Native on Windows
1.เปิดไฟล์ project\android\app\build.gradle
    แก้ไขจาก
      buildTypes {
        release {
            minifyEnabled enableProguardInReleaseBuilds
            proguardFiles getDefaultProguardFile("proguard-android.txt"), "proguard-rules.pro"
        }

    เป็น
      buildTypes {
          release {
            signingConfig signingConfigs.debug
        }

2.ที่หน้าจอ node.js cmd ใช้คำสั่ง cd ไปที่โฟลเดอร์ project\android\
   cd android
   จากนั้นใช้คำสั่ง
   gradlew assembleRelease

3.มันจะ build จนสำเร็จ
   BUILD SUCCESSFUL in 13s
   ไฟล์ apk จะอยู่ที่
   project\android\app\build\outputs\apk\release\